These days, almost everything can be done online. The technological advancement of this century makes everything more convenient to do. But these conveniences expose more data and information that can put you at risk. Everything that you do involving the World Wide Web gathers all types of information, even personal information. But we wouldn’t want that, don’t we? This is the fundamental reason why VPNs exist.
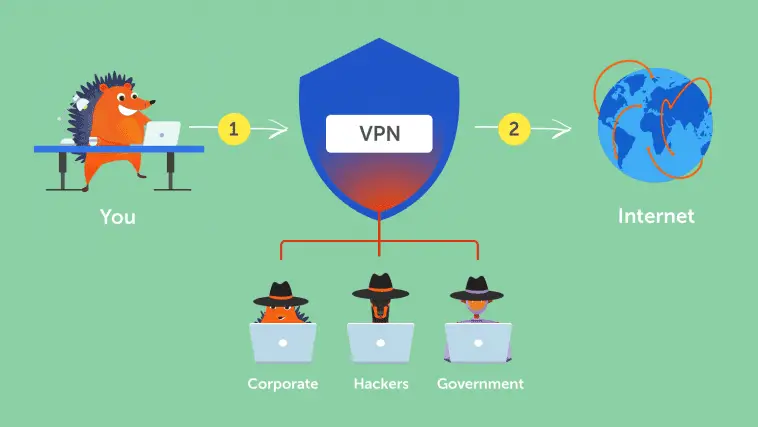
Virtual Private Networks or VPNs are used to serve as strong service protection and privacy. This frees you from worries, especially when getting connected to public Wi-Fi networks. With all the benefits they offer, it will help your online browsing activities private and encrypted, directing the traffic from your device to an unknown private server. Read on and allow this post to help you how to set up a VPN on your personal server.
Step 1 – Prepare Your Device
Preparation of devices is essential, considering that sometimes, conflict may arise due to different setup of networks, desktop in particular. This will reduce the chances of problems that may occur once your new VPN is all set up.
The first thing to do is to remove or uninstall other VPN clients on your server, which you no longer use or no longer need. It’s not a requirement. VPNs can work at the same time. But one of the reasons why we suggest to use just one is to alleviate possible issues that may arise.
Another thing to take into consideration is your network consideration. Complex computer setups and systems have the ability to confuse once VPN clients are installed. If you’re connected to Wi-Fi, it would be best to use a different wired connection.
Step 2 – Choose a VPN
There are different VPNs available on the internet. Some are paid while some can be used for free. You see, your security can be free and limitless once you have chosen the right VPN service. This security service comes in different types and offers. From the data allowance, speed, and location, VPN services can offer it all. Some that offer free trials are for a limited time only while some offer lifetime opportunities but with a cap and limitations.
Be wary of the consequences of other VPNs. Sometimes, it can slow down your internet speed and deliver lags on your server. This is why you have to choose wisely and base it on how you use your computer and what are the common activities you do on the internet.
Step 3 – Download and Install VPN Clients
The third step to do is to install VPN clients that are often offered by your VPN provider. Always check the software they offer, whether it is iOS, Windows, or Android. Check first the software they offer and see for yourself if they are operating accordingly.
Browse the downloads page that can be seen on your website of your VPN provider. You can also download applications so you can maximize the usage on many devices as much as possible. This not only protects your browsing activity from your computer or laptop but as well as on your cellphones.
The good thing about VPN providers, when something seems off while using it, you can contact them right away. You can ask them about the other platforms or software they offer that suit the device your using.
Step 4 – Log-in or Register to the VPN
The next step is to register and log-in. Some VPN providers do not require registration. They require random usernames instead. If your chosen VPN requires personal information, it would be best to create a random e-mail with false information. This will add protection to your personal information, and it will be harder to track down your location.
Always check the information they are requiring and seek for ways on how to conceal your true identity. Do not use numbers or letters that are associated with your birthday, address, initials, and other personal information. Make the registration as random as possible.
Step 5 – Choose the Right VPN Protocols

The fifth step is to choose the right VPN protocols. These are used to choose the process of how the data is routed from your computer and the unknown VPN server. They offer different features, such as improved security, speed, and security, while performing online activities. Here are the VPNs that you can look for.
PTP
The PTP or Point-to-Point Tunneling Protocol is one of the OG VPN protocols. Due to its old age, the people who use this becomes less and less as time goes by and VPN providers start to come up with new and improved protocols offering the safest and fastest VPN protocols available online.
SSTP
The SSTP or the Secure Socket Tunneling Protocol is one of the famous creations of Microsoft. It is often used by MS OS as early as Windows Vista Service Pack 1. The reason why most people are fond of SSTP because of the features delivered by their VPN protocol. This includes 2048-bit TLS/SSL certificates required for authentication and 256-bit SSL keys used to strengthen encryption.
L2TP
Another VPN protocol commonly used is the LT2P or the Layer 2 Tunnel Protocol. They establish high-quality security protection. It usually comes together with the IPSec protocol, which makes it one of the trusted VPN protocols. They have the ability to encrypt and authenticate the data that is sent over to the VPN.
Step 6 – Check the Connection
The second to the last step in setting up your VPN is checking the connection to see if it’s already working. Manage the settings to see if your chosen VPN suits the activities you’re going to deliver. From your browsing activities up to the tunneling of data, everything needs to be checked to see if they are working accordingly. VPNs start working as soon as you turn on the power button. You can have it running the whole day or during office business hours. Know that some VPN providers have a data cap refreshed on a daily, weekly, or monthly basis. You can launch it only when your access requires data protection.
Step 7 – Troubleshoot if Necessary
The final step is troubleshooting. It’s not actually necessary, but you have to perform it if your VPN provider’s client fails to work as soon as you hit the launch button. It would be best to shut down your computer or your phone, and as soon as it restarts, reopen the VPN client.
Another option will be to check if there are other VPN software running alongside your recently launched VPN. Try disconnecting it then restart your VPN software. These two steps are commonly used to troubleshoot the VPN software if it’s not working as soon as you hit the launch button. This is the last step in doing how to to set up a VPN.
Conclusion
There are numerous people who are interested in setting up a VPN, and common reasons why they don’t is because they don’t know how to setup a VPN. With this 7-step guide, you’ll surely be excited to try using VPN for whatever reason it may serve, such as personal and business utilization. Most people who have micro or macro businesses use VPN to keep their transactions, business plans, and others private. Considering that all VPN providers offer security, always compare the features they are associated with. This will help you enjoy more of what it can offer and deliver high security to your computer or cellphone. Get acquainted with everything about VPN before you start using it so you can enjoy more of its benefits.